“Oversteer” and “Understeer” in the BTCC

During a BTCC race weekend is it common for the drivers and commentators to talk about an “under-steering” or an “over-steering” BTCC car. But what exactly is meant by the terms?

In the following animations we can see Andrew Jordan * demonstrating the two main handling characteristics in his Pirtek Civic**

Under-steer

First of all we will look at “Under-steer” or “being tight” as the Americans would say.

“Under-steer” is when during cornering the front tyres loose traction with the racing circuit whilst the rear tyres still have grip.

As the front wheels steer the car if they loose traction, the car will not steer and will continue to push forward no matter what steering angle is input.

In the below animation the tyres are shown so that steering input can be viewed.

(For clarity no driver correction steering action has been shown in any of the animations.)

UndersteerGIF

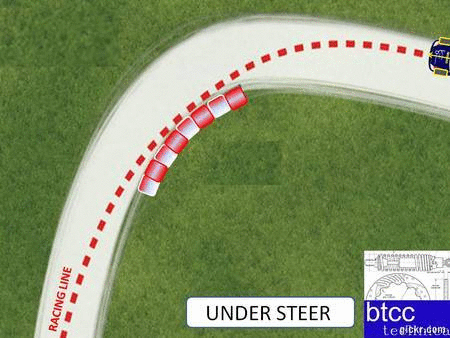
Looking at Andrews demonstration, it can be seen that as he enters the corner and turns in the front tyres loose grip and the car continues on-wards away from the racing line and on to the grass.  The car wants to go straight on, instead of around the corner.

A few basic things a race engineer may try to do to combat under steer is to soften the front suspension with softer springs, damper settings or a thinner anti role bar to try to increase the front grip( increase the tyre contact patch with the circuit through cornering).

Other options are to increase the rake of the car (raise the  ride height at the rear or lower the front ride height)  This will cause the center of gravity to shift forward increase the downward force on the front of the car and help increase grip.

Other options to help increase front end grip over rear end grip is to increase front camber and decrease rear camber.

Over steer

anim_7e95ab6b-7bcf-8034-199f-2b09ede76d41[1]

Simplistically an “over-steering” car or a “Loose car” is when during cornering the rear tyres loose traction with the race track but the front tyres still have grip and the  rear of the car slides outwards with the corner force.

To try to improve the over steering car a race engineer will try to increase the grip at the rear of the car (or decrease the grip at the front) often by softening the rear suspension again my softening damper settings, spring rates or anti-role bars (stabilizing bars).

So in summary an under-steering car means not enough grip at the front and an over steering car means a lack of grip at the rear.

A balanced Car

Finding a good balance for a race car around an entire circuit can be a very difficult challenge for a race engineer and often trying to dial out over steer can result in under steer and vice-versa trying to dial out over steer can result in under-steer.

Improving the car for one corner can also unsettle it for other corners meaning a comprised balance may be the fastest setup for a certain circuit.

With a well balanced car with neither excessive over or under -steer  the driver can feel confident to push to the maximum level of grip through the car,

anim_31282621-86f2-aee4-01b5-04dd83396d6c[1]

* A virtual Andrew Jordan was used in this blog post. (No Andrew Jordan’s were hurt in the making of this blog.)

** No BTCC cars were damaged in making this blog post.

Take a look at the rear workings of a NGTC racer.

Following on from one of my previous post where we looked at the rear suspension of  a 2012 BTCC Next Generation Touring Car (Maybe it should now be current generation Touring Car Regulations?!)

Which can be found here:

https://btcctechnical.wordpress.com/2012/02/20/looking-at-a-ngtc-rear-subframe/

BTCC racer Rob Austin has kindly shared the below photo on his face book page. http://www.facebook.com/pages/Rob-Austin-Racing/300548846320 which shows his complete rear sub frame assembly striped out of the car.

Unlike the rest of  the NGTC grid Rob’s Audi is the only rear wheel drive car. (the BMW’s are built to S2000’s regulations with a NGTC engine fitted)

So what can we see in this photo?

Item 1 shows the Penske (http://www.penskeshocks.co.uk/) coil over dampers 2, shows the suspensions rocker, 3 the upper wishbone and 4 the  suspensions push rod. The relationship between these items is discussed in my previous blogs and a simple animation of the system I have made is shown here:

The brackets which the wishbone mounts to the subframe are highlighted with a 5. The Touring car teams will have to keep a large quantity of these spare, as we can surmise that this area will be a particularly weak spot and with the close wheel to wheel racing that the BTCC is renowned for it is likely that these brackets will often require to be changed.

The Audi’s drive-shafts can be seen in item 6  highlighted by the yellow dashed boxes. The drive shafts transfer the rotational drive from the differential to the wheels.

The differential can be seen mounted as point 7 with the splined connection shaft highlighted as point 8  the prop shaft which connects to the gearbox at the front of the car.

Pointshows the anti-roll bar which runs between the left and right hand suspension.

Feel free to leave any comments below or email me at btcctechnical@gmail.com. Also don’t forget to follow me on twitter: @btcc_technical so you don’t miss any new blog posts!

Racer eye view of a touring car

This post we will take a look at the view a touring car driver has of his racer and the controls he has at his (or her) finger tips.

The below photo is taken from the drivers eye view inside the team dynamics Honda racing Civic and was (again) published by Matt Neal  (published on https://twitter.com/ by @MattNealRacing )

ImageIThe BTCC NGTC specification dictates that a Cosworth electrics package ( http://cosworth.com/products/motorsport) is used which consists of  ECU, Dash, data logger  and switch panels.

The Cosworth electrics LCD digital dash and combined data logger can be seen in Item 1. This display not only displays crucial information to the driver but is also the vehicles data logger and stores information for the teams race engineers (and TOCA scrutineers)  to analyse after the race.

The screen has many display pages and a “warm up” page can be selected to display water and oil  temperatures and pressures in the garage. “Race pages” can be selected for the race which displays information such as RPM, speed and lap times.

Clear alarm messages are displayed on this screen should any temperature or pressure rise or fall from a pre-determined range. The background color of the screen turns from the standard “Normal condition” blue to “Alarm” red to ensure that alarms are clearly visible to the driver. In the photo the background is “alarm” red and the  message: “fuel press low” is displayed. This obviously means that the fuel pressure is low and is probably because the photo was taken in the pit garages when the fuel had been removed from the car.

Shift lights are positioned above the LCD screen shown in point 2, which illuminate and indicate at the optimum point to change gear.

The Cosworth “Membrane switch panel” can be seen in point and it is positioned so that it is within view and reach of the driver it controls all the items that may need to be switched on or off on the race car. In the below diagram I have identified the function of each of these buttons.

In addition to the controls on this panel other controls which are frequently required to be used during the race are added to the steering wheel for ease of use. These controls are:

4, This button is labelled as PTP which I believe stands for “Push To Pass” and will be used to control over boost, Not allowed in 2012 but to be introduced in 2013.

5,  Dash- This button selects the display on the LCD dash and is used to scroll through the display pages I.E from warm up page to race page.

6, Flash- This button is used to control the head lights to allow them to flash.

7, BrakeThis controls the solenoid valve which locks and releases the brake lines to the rear calipers, this is used as a type of hand brake and is pushed to release the brakes on the start of the race.

8, Radio- This button allows the driver to speak to his engineer in the pit garage.

9, This knob controls the brake biase and is wound clock wise to move the bias to the front brakes and anticlockwise to change the brake bias to the rear. Most racers of front wheel drive cars in normal conditions have the bias wound fully to the front.

10, This red button activates the cars on-board fire extinguisher and has to be positioned so that it cannot be accidentally activated but so that it can be reached in an emergency.

Feel free to leave any comments below or email me at btcctechnical@gmail.com. Also don’t forget to follow me on twitter: @btcc_technical so you don’t miss any new blog posts.


A glimpse under the hood of a BTCC NGTC!

This post we will take a look at whats under the body work at the front of next generation touring car (NGTC) The following photo was taken during the build of Team Dynamics Honda Civic touring car. (published on https://twitter.com/ by @MattNealRacing ) So what is lurking under the hood of a NGTC racer?

Image

The TOCA specified steel tubed front sub frame manufactured by GPR Motorsport (http://www.gpr-motorsport.com/ can be seen fitted to the front of the car wrapping around the cars Neil Brown engineering 300+bhp K20 engine (http://www.nbe.co.uk/) highlighted as number 1.

The cars front left hand Penske (http://www.penskeshocks.co.uk/) coil over damper can be seen laying horizontally connected the rocker, highlighted as 2 andrespectively.The pushrod which transfers the movement of the lower wishbone to the rocker and then to the coil over damper is highlighted as number 4.

The cars anti roll (or stabilizing bar) is not fitted in this photo but the two bearing blocks which it mounts into as it runs from the left to the right of the car are visible on top of the sub-frame highlighted as number 5. Different thicknesses of anti roll bar can be used to set the car up to different circuits.

The cars three hydraulic reservoirs can be seen in number 6, with one reservoirs for the front brake circuit, one reservoir for the rear circuit and one reservoir for the clutch circuit. The bracket for these reservoirs is shown as being cable tied to the sub frame, this is probably temporary as it doesn’t look as secure as would be expected and the reservoirs could rotate around the tube with the cars vibration.

The cars alternator which generators an electrical charge to charge the battery and also help run the onboard electrics, can be seen in number 7. In the past teams have used Mclaren electronics alternators (http://www.mclarenelectronics.com/Products/Document/Alternators%20Application%20Note) part of the Maclaren F1 group.

The air induction and turbo system for the car is not fitted in this photo and the a white plastic shield is fitted over the air intake ports to prevent debris from accidentally falling into the engine, Number 8. The text “Neil Brown engineering” can be seen printed on this temporary shield.

The cars starter motor is visible in number 9 this is normally hidden from view by the car’s air induction system this is use to drive the engines fly-wheel to turn over the engine.

A heat exchange is shown in number 10 and the hose coming off to the left of the photo connects to the underside of the radiator which is not fitted in this photo.

The Xtrac (http://www.xtrac.com) sequential gearbox is shown as number 11 the shifter mechanism is not fitted in this photo and is normally located on the top side of the gearbox housing.

The coil over dampers horizontal location running from the front to the rear of the car may look slightly unusual as compared to the traditional McPherson strut suspension found in standard road cars and even to the coil over’s position of the NGTC rear suspension running left to right (as discussed in my previous blog) the following diagram and animation I have made should help to explain how the system works.

Feel free to leave any comments below or email me at btcctechnical@gmail.com. Also don’t forget to follow me on twitter: @btcc_technical so you don’t miss any new blog posts.

Update- NGTC Double Wishbone Animation

Following on from my last post I have created the following animation to illustrate how the suspension works!

Double Wishbone Movement

Double wishbone movement

A BTCC engineer who has experience of setting up a NGT car has informed me that due to the short wishbones used in the spec suspension, it is difficult to get the suspension travel required to achieve the optimal setup. Most cars will be using all available  suspension travel.

Feel free to leave any comments below or email me at btcctechnical@gmail.com. Also don’t forget to follow me on twitter: @btcc_technical so you don’t miss any new blog posts.

Looking at a NGTC Rear Subframe

The BTCC’s lattest specification “NGTC” touring cars use a common standard TOCA front and rear suspension assemblies regardless of base vehicles manufacturer. In this post we will take a look at this TOCA rear subframe assembly.

Matt Neal (@mattnealracing) has kindly published this picture on http://www.twitter.com showing his teams (Team dynamics) new Honda racing 2012 Civic.  So what can we see in this photo?

This photo is taken from the rear of the Civic, looking through the tailgate opening down at the rear floor of the shell.

Highlighted in point 1 is the common NGTC rear sub frame which is a fabricated suspension assembly manufactured for TOCA by GPR Motorsport (http://www.gpr-motorsport.com/). You can see that this assembly is similar to the front sub frame (discussed in this post https://btcctechnical.wordpress.com/2012/02/14/a-quick-once-over-of-a-btcc-ngtc-front-sub-frame/) And is also quite a considerable heavy duty fabrication made from of steel tube. You can see that it is mounted to the underside of the shell and is tied into the rest of the vehicle  at  four mountings points highlighted in point 2. These mounting points are incorporated into the cars roll cage which connects front and rear sub-frames.

The suspension provided by these sub-frame assemblies is double wishbone and as oppose to Mcphearson strut suspension found on S2000 specification cars, the dampers are laid out flat to the floor in the shell running left to right, These are shown in highlighted point 3. The NGT cars use a Penske nitrogen filled dampers (.http://www.penskeshocks.co.uk/The resevoir for the damper is local to the damper and is highlighted in point 4.  The damper can be adjusted via the adjustment nobs on this resevoir, Highlighted in point 5.  The NGTC’s use coil over dampers, springs with different spring rates can be fitted over the damper depending on the car setup.  The spring is not fitted in these photos, however I have highlighted the area where the spring would normally be fitted in point 6.

Access to the dampers will be via a removable cover which will normally hide this assembly from view, this cover is not fitted in this photo.

To the rear of the sub-frame assembly it is possible to see where the rear air-jack is mounted, The rear air jack, which raises the rear of the car is hidden from view by the flat steel sheets, however you can see the hard air lines leading to the cylinder , I have marked the approximate position of the air jack highlighted in point 7.

The fuel tank is fitted in this photo and its located forwards of the rear suspension highlighted in point 8 and the cars fire extinguisher can be seen to the left of the fuel tank highlighted in point 9.

Seeing the dampers laid out across the floor in the above photo it can be a little confusing to picture how the suspension all links together. To help clarify how this suspension works I have created the below illustration:

(Illustration not drawn to scale)

The top illustration shows the double wishbone suspension at rest and the lower illustration shows the suspension moving under load, perhaps when ridding over a curb.

You can see in this illustration that the damper is laid out horrizontaly as we see in team Dynamics photo and is connected to the rest of the suspension via a pivoting “rocker” and a push rod.

So how does this system work? As the wheel moves upwards under load the push rod pushes against the rocker which transfers the movement to a flat horizontal movement compressing the spring on the coil over and pushing the piston into the damper.

This suspension system used by all NGTC’s  is more advanced than the Mcphearson strut systems used in other s2000 touring cars and is in fact used by most single seaters and should allow some very fast corner speeds.

Feel free to leave any comments below or email me at btcctechnical@gmail.com. Also don’t forget to follow me on twitter: @btcc_technical so you don’t miss any new blog posts.

Latest sneak photos of Honda’s new BTCC machine.

Honda Racing (Team dynamics) have released some sneak photos revealing there new NGTC racer, via their face book page: ( http://www.facebook.com/HondaRacingBTCC )

Lets take a quick look at these photos and compare the new NGTC to the standard road going 2012 Civic.

So what can we see in these photos? well as intended by Dynamics/Honda not very much unfortunately…

However you can see the considerable fibre glass wheel arch extensions which have been bonded on to the shell to accommodate the new NGTC subframe and suspentions mechanical width of 1875mm, which is 105mm above the standard car width of 1770 mm, This additional width is highlighted in highlighted point 1 for the front and Point 3  for the rear.

highlighted point 2 shows that the dark plastic section of the standard civics bumper has now been colorour coded to the rest of the body,

One  interesting thing we can notice from looking at the rear images of the car is that Team Dynamics have fitted a different specification rear spoiler (or at least spoiler end plates)  to the rear of their Civic. This is shown below compared to the Specified rear wing fitted to the Toyota Avensis and RAR Audi A4.

It is quite apparent from these photos that the end plate for the spoiler is of a different shape and specification. It may be that Dynamics have had special dispensation to run this different design wing from TOCA as there is a lack of space at the rear of the Hatch back Civic to fit the large wing end plates, unlike the more traditionally saloon shaped Audi and Toyota.  It may of course be that this new shape is now available and in the regulations for all teams to use in the 2012 season.

The rear wing of a Touring car is predominately for aesthetic reasons and it serves little aerodynamic affect on to the cars other than perhaps increasing drag.  Most teams front wheel drive touring cars run the rear wings at a neutral setting as adding “down force” to the rear of a front wheel drive is not desirable.

The photos released by Dynamics show that at least one of their BTCC cars is basically complete in good time for the start of next season.

Feel free to leave any comments below or email me at btcctechnical@gmail.com. Also don’t forget to follow me on twitter: @btcc_technical!

Rob Austin’s Closed season Audi Improvements.

So far the BTCC Technical Blog has been very Honda biased, This is mainly due to the amount of behind the scenes photos which have been available, (courtesy of Matt Neal via @mattnealracing) and is not to do with any personel team preferences!

In this post lets take a quick look at a different team with a completely different brand of car, The Rob Austin Racing (RAR) Audi A4. This car was built for RAR by GPR Motorsport (http://www.gpr-motorsport.com/) the engineering company which was awarded the TOCA contact for designing, manufacturing and supplying the NGTC specified front and rear subframe suspension assemblies, (see my earlier blogs below) This differs to Team dynamics, who built the Civics themselves purchasing only the Front and rear sub-frame assemblies from GPR.  Having taken delivery of the car, RAR reported that they found it to be over weight and  have been continuously developing it. This has been continuing over the closed season, but if the front and rear sub-frames are a specified TOCA item what is it that RAR have been developing?

lets take a look at the below photo released by Rob Austin Via his twitter (@robaustinracing)

ImageIn this photo you can see that RAR have basically cut out, redesigned and remade from new the entire role cage which ties the front and rear sub-frame assemblies into the shell.

in point 1 you can see that it looks as though the cages verticle cross brace has been moved further to the rear of the car by what we can estimate to be about 200mm. The main reason for this was probably to move weight more to the centre of the car.

You can plainly see by comparing the seat position in highlighted point 2 (David Pinkney driving) its in front of the shells B-pillar in an almost standard cars seat position, as compared to the new seat position in the main image where the seat is obviously much further to the rear and is now located behind this B-pillar.

Moving the driver backward towards the rear of the car could result in ~75kg ( ~12 stone) for an average driver  closer to the centre point of the car helping with the weight balance of the car and the center of gravity.

Being that the front and rear suspension are specified by TOCA and will be identical for all NGTC vehicles along with the engine the shell will be one of the differentiating parts between cars and as such it is important to ensure it is optimized a s much as possible.

The drivers controls of course will have to be modified to suit this new driving position, with the steering rack  Column (sorry typo) and gear shifter linkage requiring to be extended.

It is reasonable to assume that the cage has been completely redesigned to use only the minimum material required to ensure a safe ,stiff shell but to save as much weight as possible.

Item 3 shows the bespoke transmission tunnel which has been fabricated  running from the front to rear of the car, its not clear in this photo if this has been modified over the closed season or is original from GPR’s build.

By carrying out this activity RAR should be able to ensure they have a competitive base which can continue to be developed through out the season.

Feel free to leave any comments below or email me at btcctechnical@gmail.com. Also don’t forget to follow me on twitter: @btcc_technical!

looking at a BTCC NGTC front sub-frame

Any team building a BTCC touring car to the NGTC regulations has to use the new standard “TOCA” front and rear sub-frames no matter what model or make of car they are building.

These subrames are the mounting points for the entire suspention assemblies and the front subframe contains the engine and gearbox mounting points.

This commonality of suspension between all makes of cars will ensure that no cars built to NGTC regulations will have an advantage over another car due to the suspension the standard road going car uses. It should ensure a perforance parity and help guarantee close racing. Something the BTCC has been renowned for during its history.

So lets take a quick look at the “TOCA” front Subframe.

Photos kindly provided by Matt Neal on Twitter (@MattNealracing)

1, In this photo you can see the purchased front sub-frame laid out in front of the Civic shell. It is actually positioned 180 degrees out, to how it will be fitted to the shell. Note how solid the construction of the sub-frame is and the diameter of the tube  used. It is interesting to compare the engineering of the sub-frame something that Dynamics cannot control to the engineering of the roll cage inside the shell which dynamics can contorl. The engineering here is obviously “belt and braces” and is “over engineered” to what would actually be required,  However as this part will be common to all NGTC racers, there is no competitive benefit for it to be particularly light or refined.

2, Here you can see the connection points where the subframe connects to the welded in cage. Each of these points has to tie into the role cage to ensure the car is stiff and that there is no deflection were the subframe meets the shell. The roll cage will be specially designed to tie into the subframe at these points.

Looking at this joint I don’t think it is impossible that we will see one of these sub-frames torn completely off a touring car in an extremely violent crash…

3, Although this point is not related to the subframe, I think this photo shows quite nicely how tight the roll cage  has been designed, look at the gap between the roll cage to the “C-pillar” of the shell.  The reason the cage has been designed like this is for weight saving and to try to keep the center of gravity as low as possible and towards the center of the car as much as possible. The down side is however should one of the Civic’s roll over potentially the whole corner of the car could be deformed inwards and require this entire corner to be cur out and be replaced for new.

4,  Here you can see the mounting point supplied on the subframe for the Xtrack gearbox.

The yellow dotted lines on photo 5 show were the shell would normally be and where it has been cut away to allow the new sub-frame  to be fitted.

The above photo shows the receiving pointing points on the Civic shell itsself. where the “TOCA”  Subframe connects to the roll cage in the shell. You can see that each of these points is tide into roll cage.

It is obvious that Dynamics have carefully though out the roll cage design to ensure that the subframe ties securely in to the shell.

Feel free to leave any comments below or email me at btcctechnical@gmail.com. Also don’t forget to follow me on twitter: @btcc_technical!

Looking Inside a NGTC

Today’s blog will take a quick look at a NGTC from a touring car drivers perspective!

So what does the inside of a NGTC touring car look like and what technology can we see?

Lets take a look…

As with all race car’s where weight saving is a priority the interior has been entirely stripped out leaving just the bare minimum.

1, All electronic controls and information required by the driver is positioned around the steering column. This is a trait of all recent team dynamics cars including the last Civic, the Integra and 2001 Civic.

It is slightly unusual as the weight of all the cabling and switch gear is surprisingly heavy maybe 2-3kg.  A lot of teams choose to mount theses switches much lower to the left of the driver mounted off the floor, to help lower the center of gravity of the car.

These switch will include buttons for controlling a screen blower, wipers,  alarm reset etc..

2,  Shows the shifter lights, these will illuminate to help show the driver the optimum time to change gear.

3, The electonic dash screen will show rev counter, engine temp, oil pressure, oil temp etc.

4, Buttons on the steering wheel will control often used controls such as car to pit radio controls, main lights, the steering wheel is removable with a quick release coupling to aid the driver getting into and out of the cars.

5, The front right air jack is clearly visible, This exhausts into the car when realeased resulting in the loud roar of compressed air into the car cabin.

6, This item is a hydraulic line lock, (brake bias is controlled via the pedal box) this lock is used as a kind of hand brake and can keep brake pressure to the rear calipers to prevent the car from rolling.  Comment from a reader shown below, informs me, that this item is an additional brake bias control, which is in addition to the pedal box bias.  A “handbrake” function is controlled by an electronic  solenoid valve which holds the pressure to the rear calipers and is released by pushing a button on the steering wheel.

7,  Part of the reason that BTCC racing is so close is the use of success ballast which is awarded to the most successful drivers to equal the field. This shows the ballast box which all BTCC touring cars must be equipped with and is where the cars ballast must be fitted. The ballast it usually flat lead plates and it has to be securely bolted to the cars body.

8, This shows the sequential gear box gear lever,  Rather than a “H” pattern gear box found in a standard civic all NGTC will use the Xtrac 6 speed sequencial box, where the gears are slected sequencially by pulling on the lever to progress up through the gear box and push to move down through the gears. The arrow is pointing at the sensor on the gear lever this sensor senses the lever being pushed and kills the ignition for a fractio  of a second to help the gear change process.

8,  Gear selector lever connection rod. This rod connected one end to the gear lever passes forward through the bulk head and into the engine bay where it connects to the Xtrac gearbox. This connection rod converts the pull or push onto the gear lever into a gear change.

9, Here you can see the cars ECU mounted as close to the floor as possible, so to keep the cars center of gravity as low as possible.

10, Just in view is the cast aluminium AP racing pedal box, This pedal box contains the front brakes master cylinder, the rear brake master cylinder, the clutch master cylinder and throttle pedal which will be connected to the electric fly  by wire throttle system.

The pedal box also contains the brake bias system which allows the driver to alter the brake bias from front to rear.

I hope this gives an interesting insite into what we can see inside a BTCC touring car.

Feel free to leave any comments or email me at btcctechnical@gmail.com